
Data tables (master lists) #
Data tables are the school's master lists: classes, bus routes, hostel rooms, the fee schedule, subjects, vendors, students, staff and more. Forms read from them, so people pick from a list instead of typing, and related fields fill in by themselves.
The demo school has 19 data tables, including AdmissionClasses, TransportRoutes, HostelRooms, FeeSchedule, Subjects, Vendors, Students and StaffDirectory.
Create a data table #
- Open Data Table from the admin menu (tab Data Tables) and press the add button.
- Enter the Table Name (one word, for example
TransportRoutes) and a Description. - Add the fields (columns), for example RouteNo, RouteName, Stops, MonthlyFee. Choose a type for each: text, number, date and so on.
- Save.
Fill it #
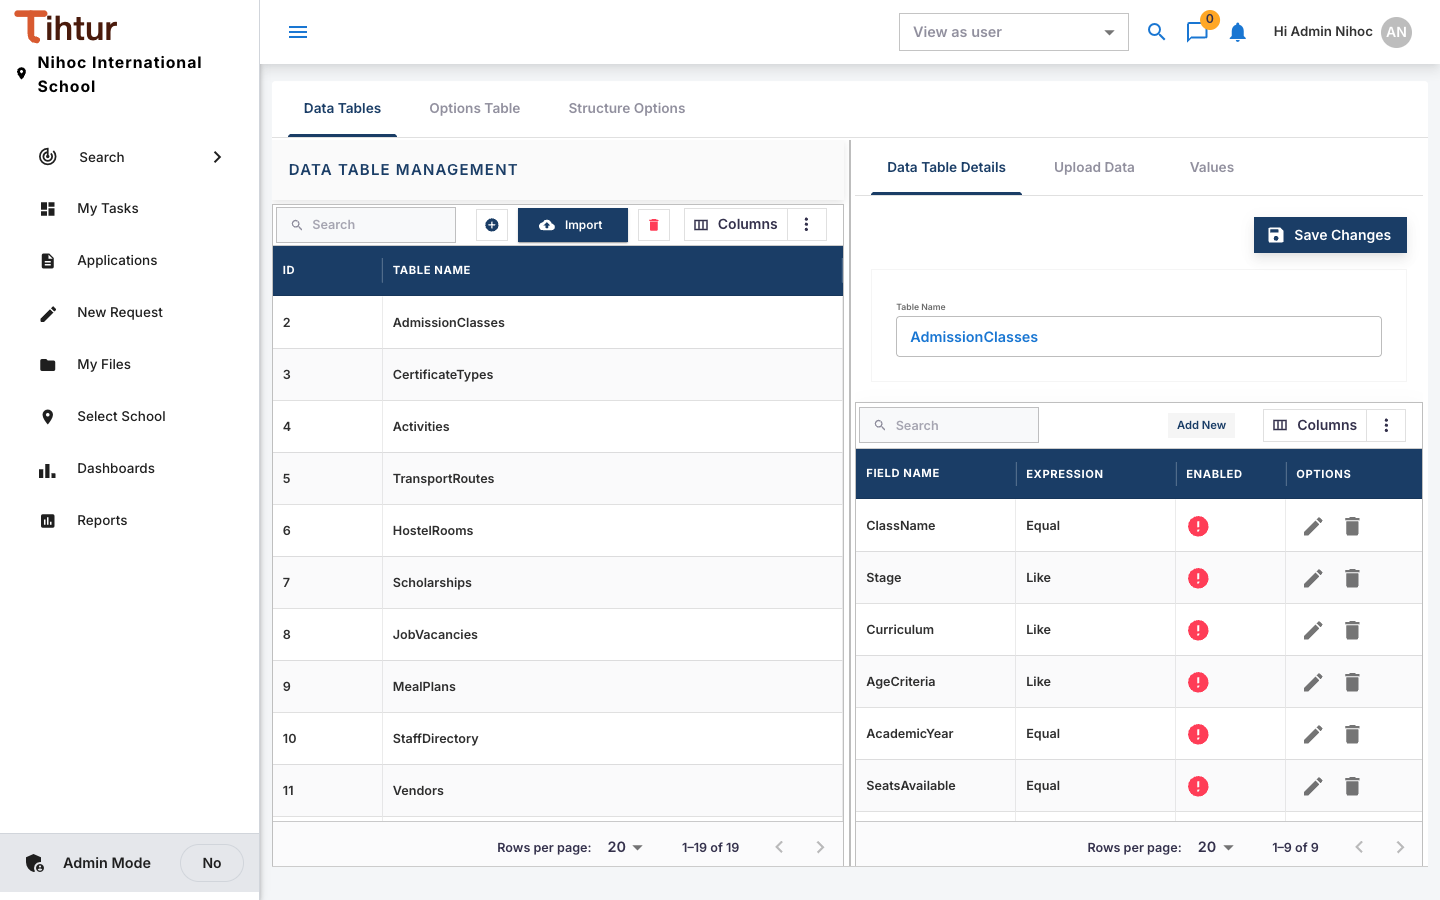
The right side has three tabs: Data Table Details (name and fields), Upload Data and Values (the rows).
- One row at a time: open the table, then Add Row, Edit Row or Delete.
- Many rows at once: press Import (or use Upload Data), then Download Sample CSV to get a template with the right columns. Fill it in Excel, save it as CSV, then Choose File and Upload.
Use it on a form #
When you design a form (Forms and tags), link a group of fields to a data table and map each field to a column. When someone picks a value, the other mapped fields fill in.
Example: the Fee Receipt record is linked to Students. Picking the Admission Number fills the Student Name and Class.
Good to know:
- A fill happens only when exactly one row matches what was picked.
- Use one data table per group of fields.
- Tables with a school column (such as Students and StaffDirectory) show each user only the rows of their own school. Other lists are shared by all campuses.
Options lists for drop-downs #
Short fixed lists, such as Blood Group, Leave Type or Payment Mode, are kept under Options Management instead of a full data table:
- Open the Options Table tab, create the list, and add its options (Option Name).
- Use it on any drop-down, radio or checkbox field.
Structure Options hold lists that differ per school or branch.
Common mistakes #
- Typing master data into forms. If a value is used on more than one form, it belongs in a data table.
- Changing a column name that forms use. The form link breaks. Add a new column instead and move the link.
- Duplicate rows. Two students with the same admission number means nothing fills in. Keep keys unique.